W350STQ Hackintosh Tutorial Part I
I’m not a stranger to hackintoshes. One of my work computers was a desktop whose parts list was taken from CustoMac buyer’s guide (here would be the buyer’s guide at the time of writing, in case you’re interested).
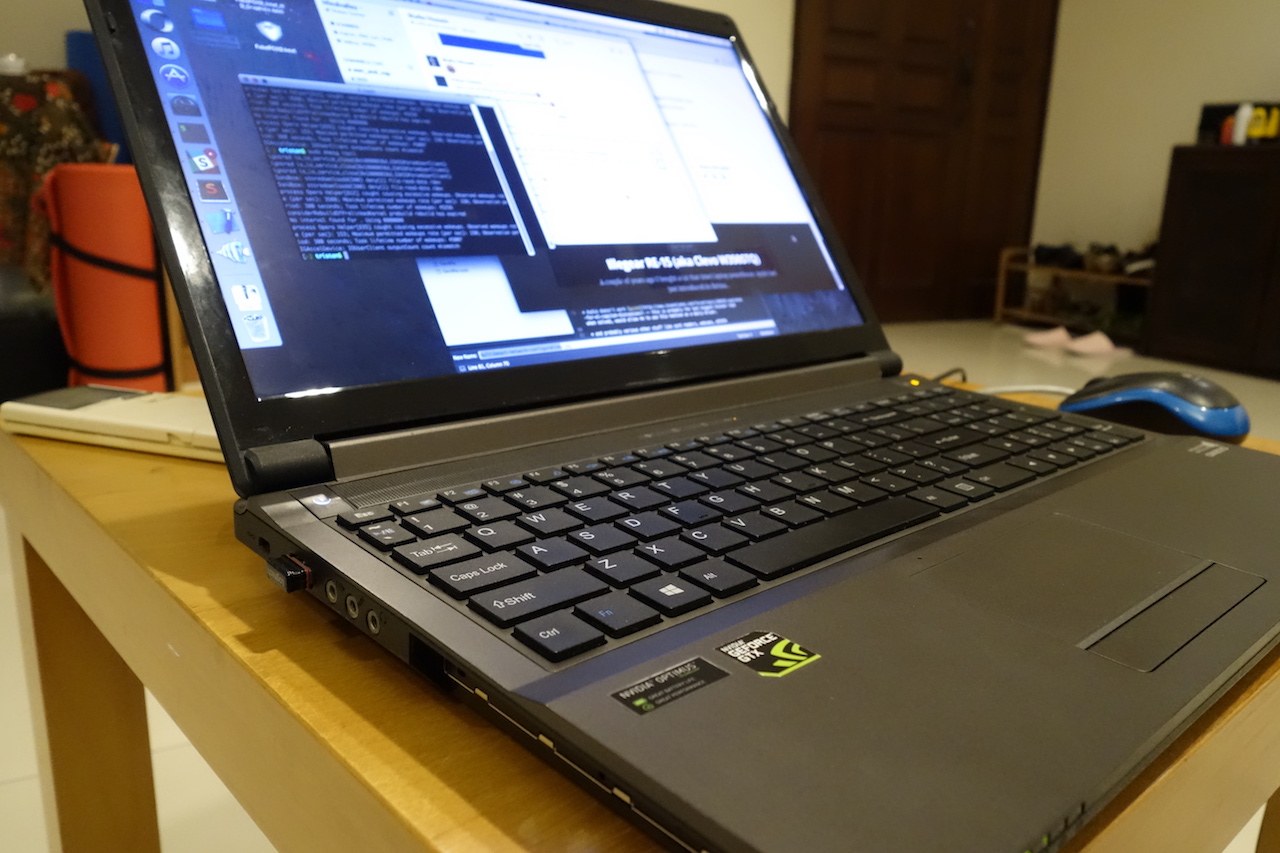
I’ve been trying to hackintosh the W350STQ since I bought it in 2013, and it’s only recently that I’ve had the time to actually follow through. Not everything works yet, and I plan on posting more updates as soon as I get an interesting breakthrough.
At this time of writing, the latest OSX version is El Capitan. Here’s a very comprehensive guide on how to get the installer and get it booting on the laptop. My own experience was very similar, but I opted for the UniBeast way instead prepping the USB installer manually.
 OSX El Capitan on a Clevo W350STQ … kinda
I downloaded El Capitan from my MacBook Air and then downloaded UniBeast. It was quite straightforward to copy the installer to my 12GB USB drive at that point; it just takes some time.
I don’t know exactly how long the whole process took though because I remember getting multiple errors when I was using an 8GB USB drive that went away when I switched to a 12GB USB drive. It could very well be that the El Capitan installer takes up more space than 8GB (even though the downloaded size was just around 7GB) but it might as well be just that particular USB drive itself. YMMV.
Booting from USB was not as intuitive as I expected. I couldn’t find a function key that would take me to a boot device screen; instead I had to press F2 to enter the system setup, go to the boot menu and at the bottom choose the USB EFI device to boot from.
Because this laptop has an nVidia Optimus card, it runs into a reboot problem while booting from USB. In clover I had to go to options by pressing the arrow keys, select the boot arguments and append nv_disable=1 before it can properly start the installation.
Macs don’t support PS2 so you’d need to have a USB keyboard and mouse to be able to continue with the installation (bluetooth drivers aren’t loaded at this point as well, so no luck with any wireless accessories). Aside from the keyboard/mouse issue, the installation went without a hitch.
After the OS Installation, I had to boot from the USB installer one more time (again adding nv_disable=1 in order to avoid the bootloop). It boots, but as before there is no native support for the built-in keyboard and touchpad. I still had to use my USB keyboard and mouse to work with the machine.
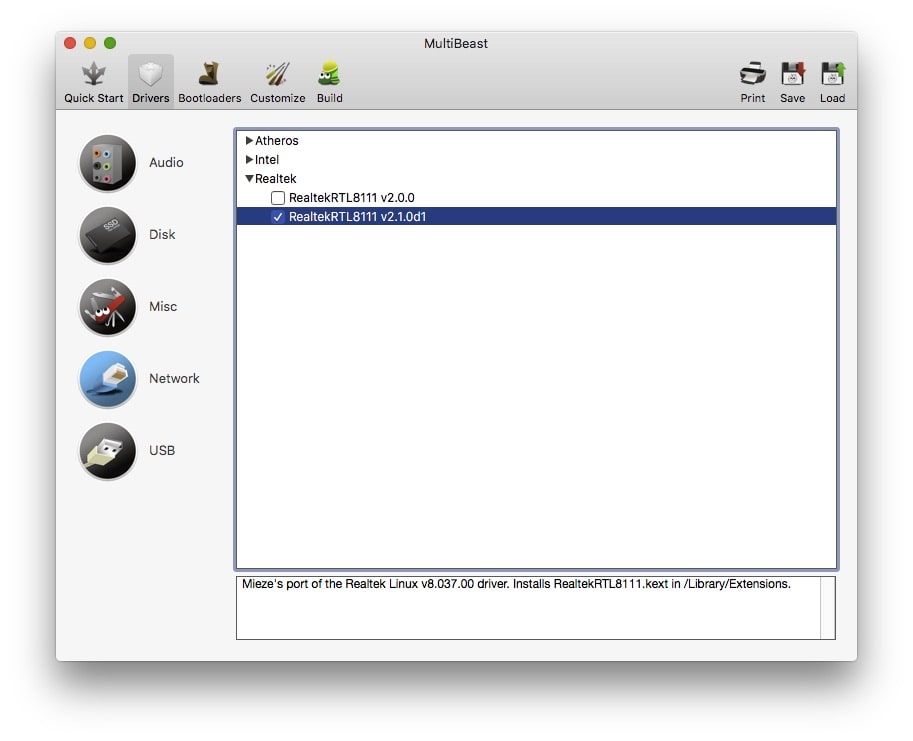
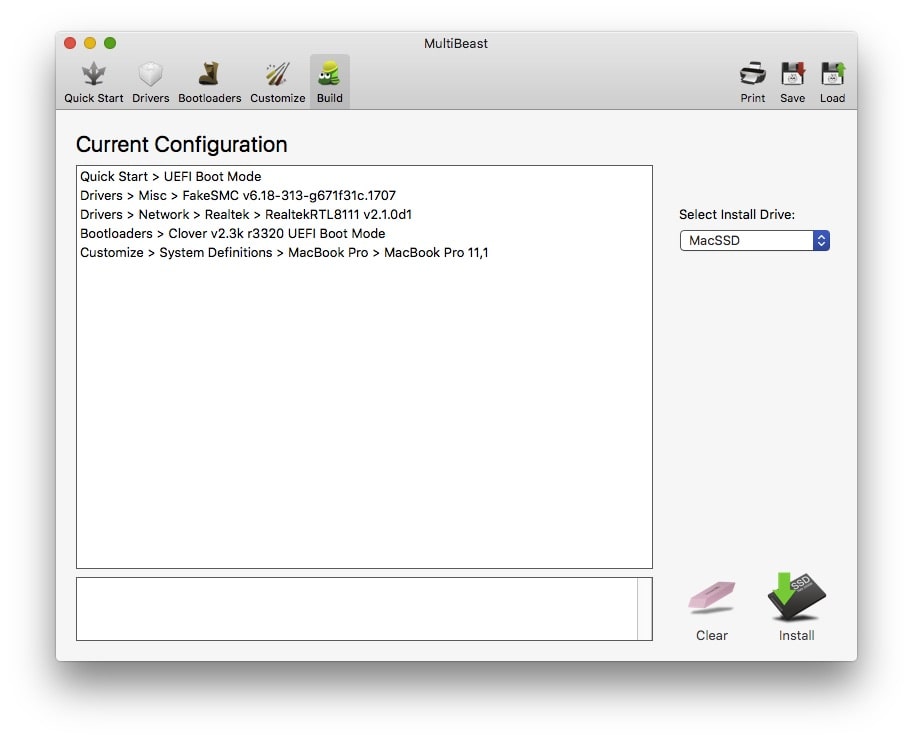
Now it’s time to run MultiBeast so we can have some basic necessities (like network connectivity). Unfortunately the builin wifi card is not supported by OSX (and probably never will be), but fortunately the builtin ethernet port is!
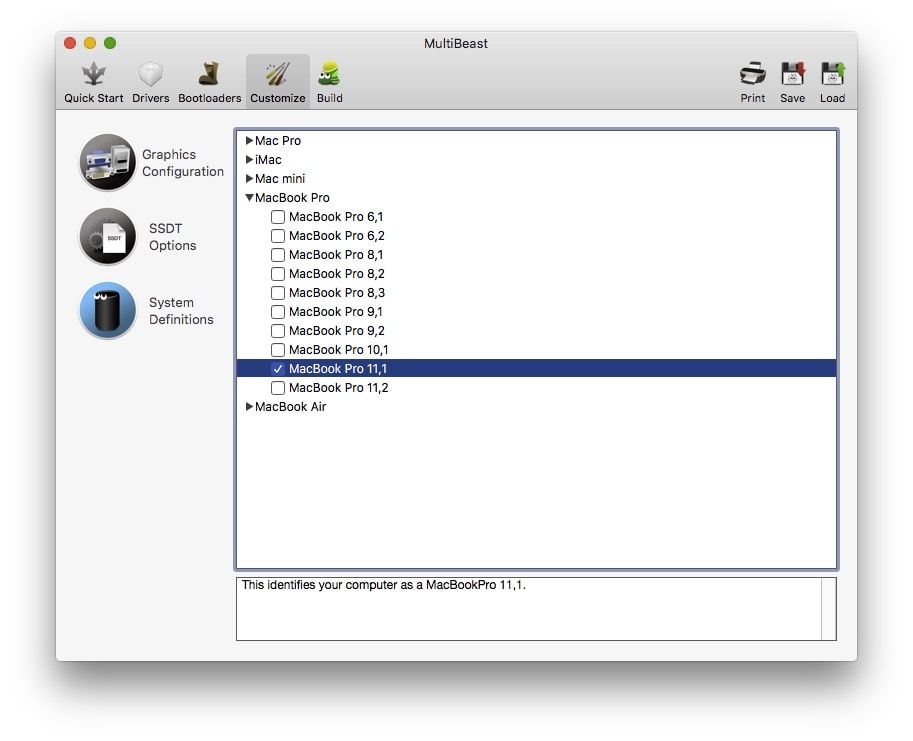
There’s also the SMBIOS configuration to emulate the characteristics of a real mac–in this case, a MacBook Pro (Retina, 15-inch, Late 2013).
Here would be the final screen before the whole thing is written to disk:
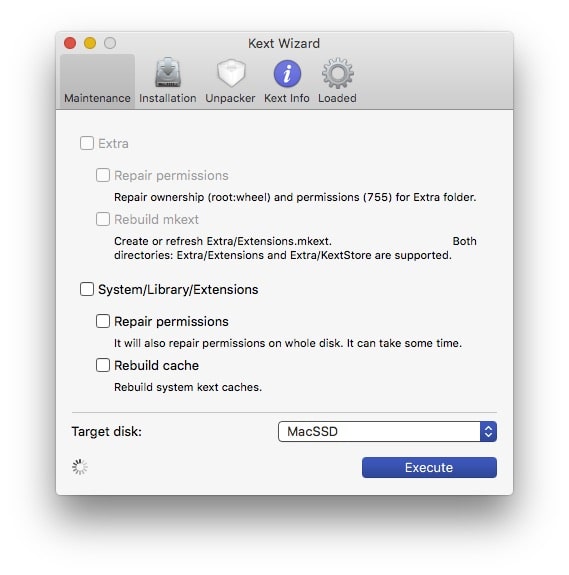
I also wanted to fix the native keyboard and touchpad, so I had to install the Voodoo PS2 Controller kext using Kext Wizard and after another reboot (don’t forget nv_disable=1, they start working :)
The keyboard takes a bit getting used to. What’s really neat is that the Alt and Windows keys have been “swapped” so they match the Mac keyboard layout more faithfully. So you would actually be pressing Command when you press Alt and would be pressing Option when you press Windows.
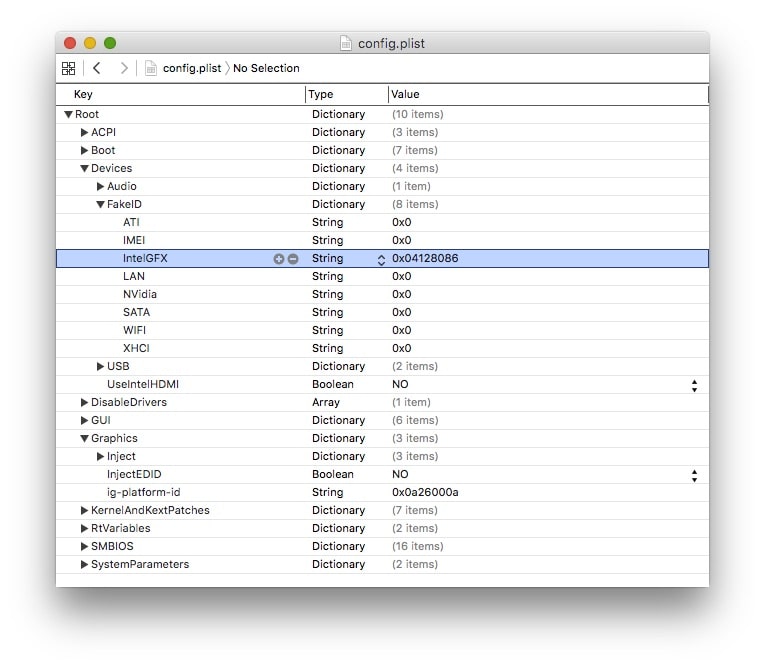
The next thing to work on was the Graphics. Right now the OS is not taking full advantage of the iGPU (it feels like some sort of “safe” mode) and the graphics show a lot of tearing. I was able to fix it by following this guide.
You’ll also need to download an EFI mounter in order to edit your config.plist. You’ll probably also need to download XCode to server as your plist editor.
After installing the FakePCIID and FakePCIID_Intel_HD_Graphics kexts, you’ll need to change your config.plist to support them. Open EFI > CLOVER > config.plist and you will have to change two entries. Find Devices > FakeID > IntelGFX and set the value to 0x04128086. The Find Graphics > ig-platform-id and set the value to 0x0a26000a
That’s it! Graphics are fast and snappy, and the whole laptop is usable. Wifi not being available is a big bummer though. Hopefully the wifi card I ordered arrives soon. We’ll see if I can start using that card as a replacement for this unsupported one.
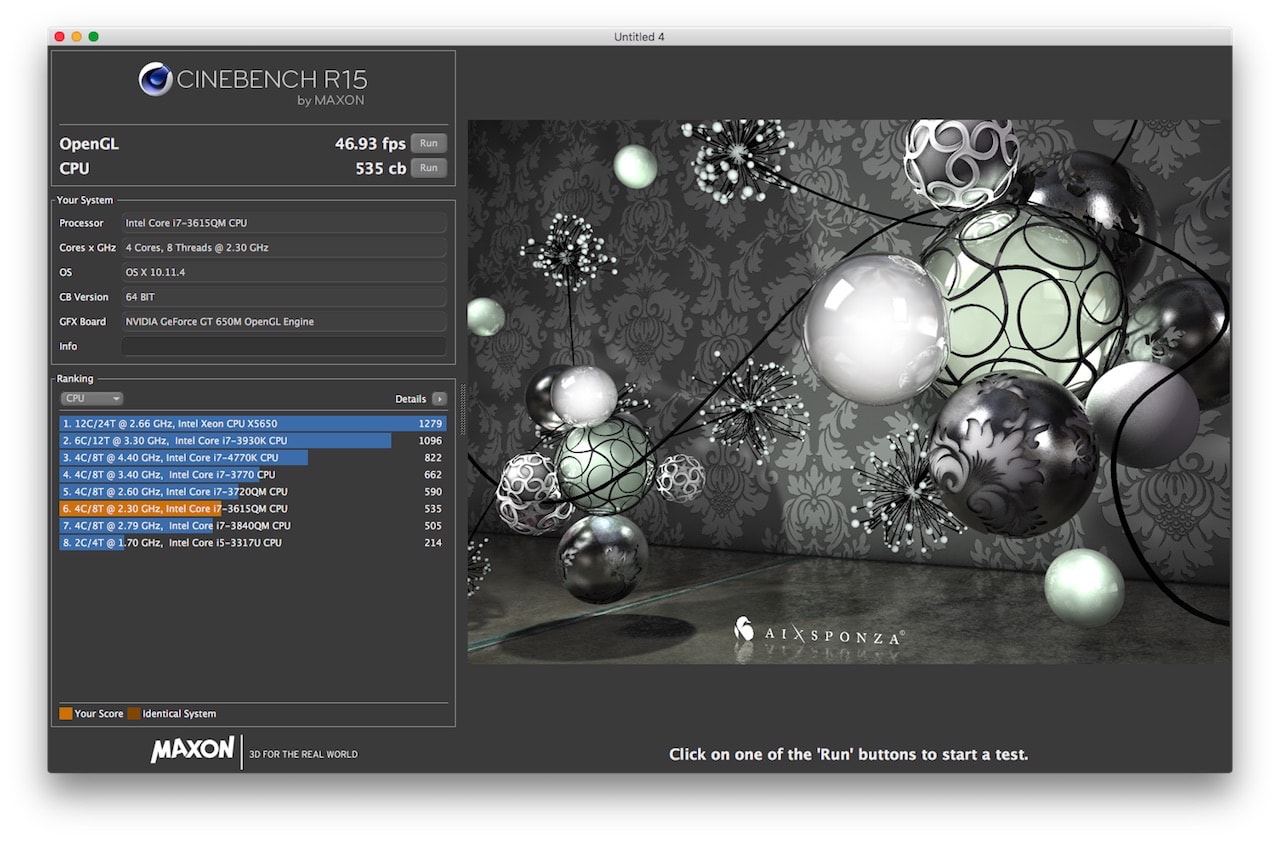
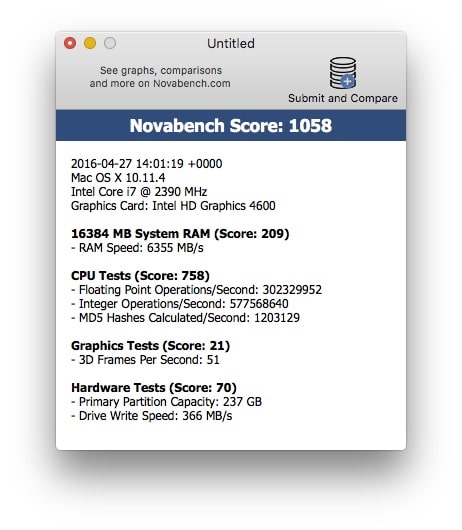
I did some benchmarks to compare with my MacBook Pro 2012 and they’re quite neck and neck. The biggest drawback with the hackintosh was that it’s not able to take advantage of the nVidia 756m since it’s using Optimus technology. I think if it were able to, it would easily run circles around the MacBook Pro.
The W350STQ also supports up to 24GB of memory, so I rebalanced the memory between the two laptops so they each have 16GB (to make the comparison fair).
These are the results from the MacBook Pro 2012:
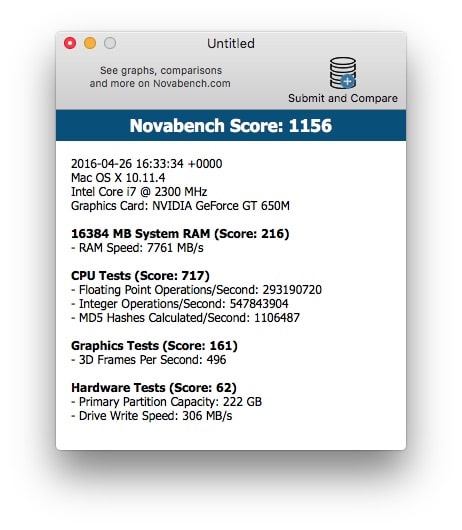
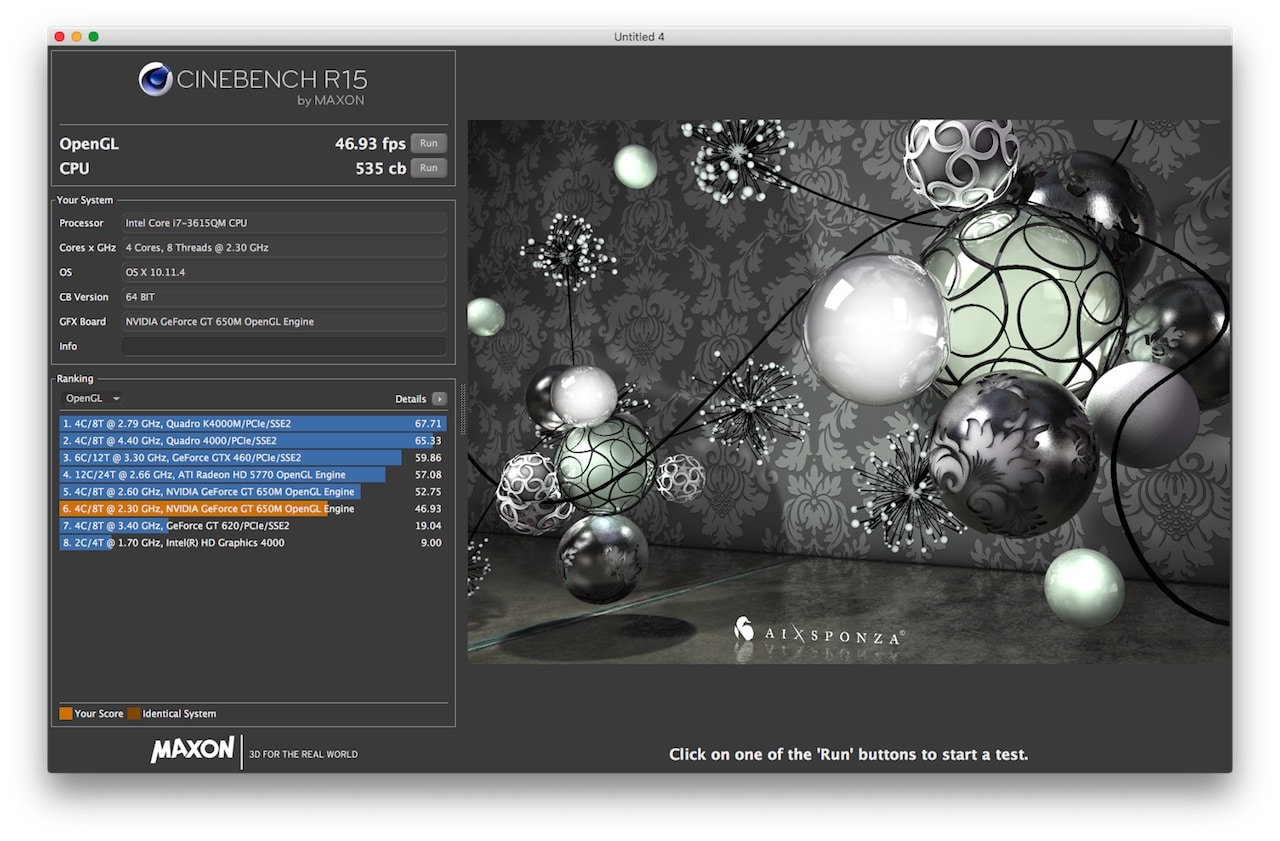
and these are the results from the W350SQT hackintosh:

As mentioned many times before, not everything works yet. Here are some items I still need to work on:
Backlight controls don’t work guide – which is not as much of a blocker I guess.
nVidia card should be disabled guide – so that I don’t have to add in the boot option
nv_disable=1Power Management doesn’t fully work guide – although apparently, sleep works (laptop lid close event also fires)
HDMI Audio doesn’t work guide – then again I’ll only need it if I connect to an external monitor via HDMI
Audio doesn’t work guide – this is probably the last biggest blocker that when solved, would allow me to use this machine as a daily driver.
and probably various other stuff like card readers, webcams, eSATA